 Contribute to Kestra
Contribute to our open-source community.
You can contribute to Kestra in many ways depending on your skills and interests. The issues with the label good first issue are a great place to start and get familiar with the codebase. Check out the current list of good first issues and start contributing.
Build a plugin
Check out our Plugin Developer Guide for instructions on how to build a new plugin.
Contribute to the documentation
We love documentation contributions. To contribute to the documentation, make sure to fork the docs repository and create a pull request with your changes.
Check out the Contribute to Kestra Documentation page for more information about building the documentation site locally, how we write the documentation, and contributing to the product and plugin documentation.
Write a blog post
You can contribute an article about how you use Kestra to our blog. Email [email protected] to start the collaboration. If you wrote a post mentioning Kestra on your personal blog, we'd be happy to feature it in our community section.
Other ways to show support
Build Kestra locally
Requirements
The following dependencies are required to build Kestra locally:
- Java 21+
- Node 14+ and npm
- Docker & Docker Compose
- an IDE (Intellij IDEA, Eclipse or VS Code)
To start contributing:
- Fork the repository
- Clone the fork on your workstation:
$ git clone [email protected]:{YOUR_USERNAME}/kestra.git
$ cd kestra
Backend development
The backend is built using Micronaut.
Open the cloned repository in your favorite IDE. In many IDEs, Gradle build will be detected and all dependencies will be downloaded.
You can also build it from a terminal using ./gradlew build, the Gradle wrapper will download the right Gradle version to use.
- You may need to enable Java annotation processors since we are using it a lot.
- The main class is
io.kestra.cli.Appfrom modulekestra.cli.main. - Pass as program arguments the server you want to develop, for example
server standalonestarts a standalone Kestra server. - The Intellij Idea configuration can be found in screenshot below:
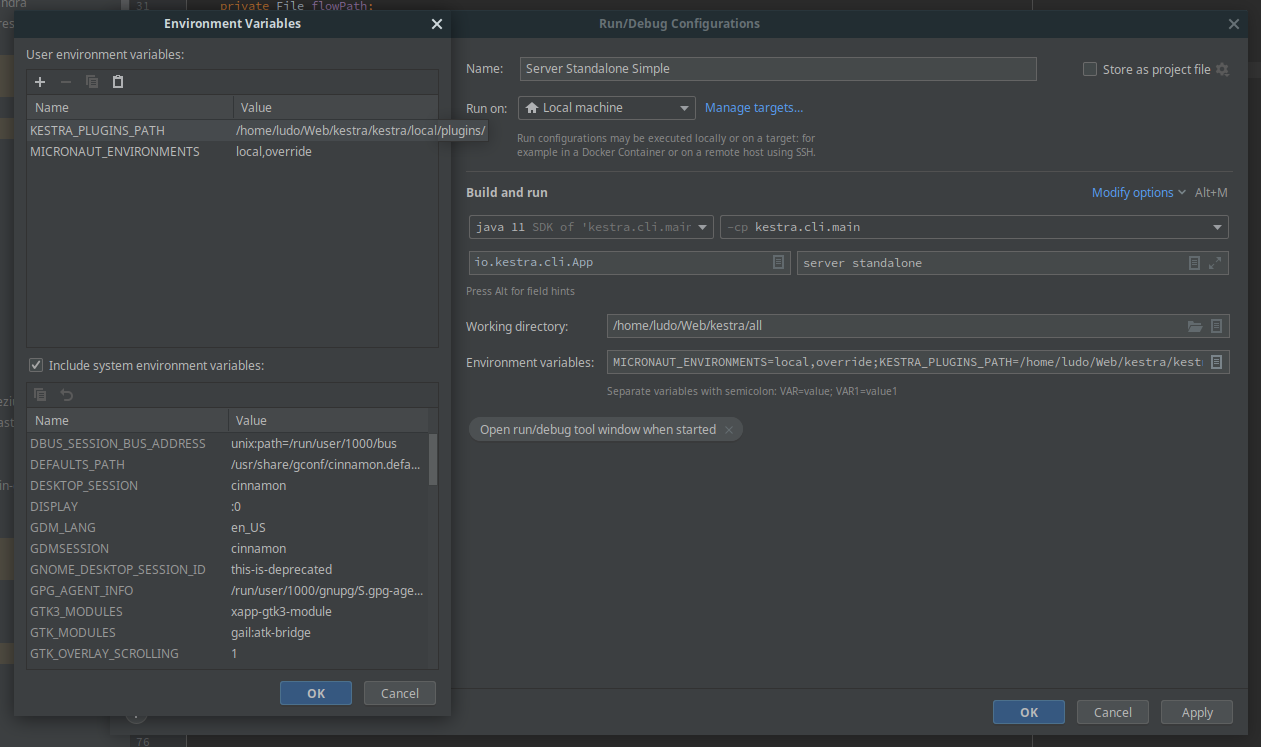
MICRONAUT_ENVIRONMENTS: can be set as any string and will load a custom configuration file incli/src/main/resources/application-{env}.ymlKESTRA_PLUGINS_PATH: is the path where you save plugins as Jar and is loaded during the startup process
- If you encounter JavaScript memory heap out error during startup, configure
NODE_OPTIONSenvironment variable with some large value.- Example
NODE_OPTIONS: --max-old-space-size=4096orNODE_OPTIONS: --max-old-space-size=8192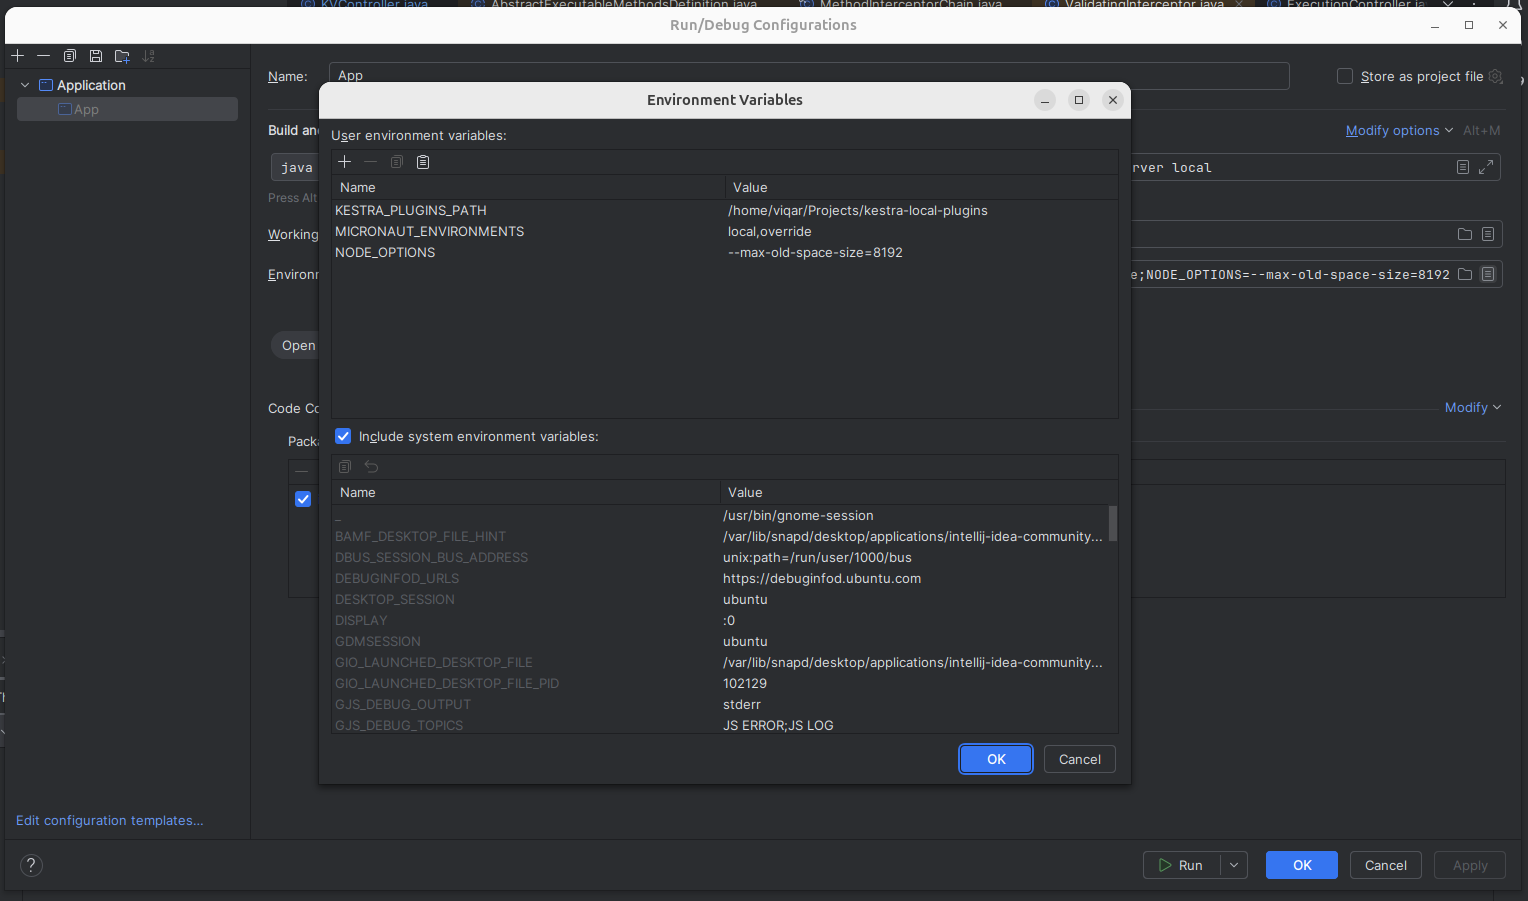
- Example
- You can also use the gradle task
./gradlew runLocalthat runs a standalone server withMICRONAUT_ENVIRONMENTS=overrideand plugins pathlocal/plugins - The server start by default on port 8080 and is reachable on
http://localhost:8080.
If you want to launch all tests, you need Python and some packages installed on your machine. On Ubuntu, you can install them with the following command:
$ sudo apt install python3 pip python3-venv
$ python3 -m pip install virtualenv
Frontend development
First, we will find all the frontend code in the /ui folder.
Our front-end uses Vue.js. But we do not need deep knowledge of Vue.js to contribute.
To run Kestra's Frontend in dev mode, we will need Node.js version 22.12.0.
The repository has a .nvmrc file.
Initial setup
$ npm install
Run the frontend
$ npm run dev
This will start a local server on port 5173.
We will need to open the Kestra UI in a browser at http://localhost:5173
Open Storybook (what we use for testing components)
We can also run the Storybook to view the components in isolation.
$ npm run storybook
This will start a local server on port 6006 and open the Storybook in your default browser at http://localhost:6006.
We can also run all tests in the command line without opening a browser:
$ npm run test:unit
Even better, we can run one test file or stories file in isolation by specifying part of its name or path in the command
$ npm run test:unit BarChart
Setup the configuration to connect to the backend
Now that we can run the frontend, if we open it, we will see a loading screen running forever. It waits for a backend to answer. Let us set it up.
- Create a file
ui/.env.development.localwith the contentVITE_APP_API_URL=http://localhost:8080(or your actual server URL). - To avoid CORS restrictions when using the local development npm server, you need to configure the backend to allow the http://localhost:5173 origin in
cli/src/main/resources/application-override.ymlusing the following addition to your Kestra configuration YAML definition:
micronaut:
  server:
    cors:
      enabled: true
      configurations:
        all:
          allowedOrigins:
            - http://localhost:5173
Then, we can run the backend by running the gradle task.
$ MICRONAUT_ENVIRONMENTS=override ./gradlew runLocal server standalone
This will start a local server on port 8080 reachable on http://localhost:8080.
Setup Kestra frontend without building the backend from the source code
If you want to work on the frontend without having to install Java and everything to run the Kestra Application, you can start a Kestra Docker container and connect the frontend to it.
To do so, you can first use the following docker compose file.
Save it as docker-compose.yml in a separate directory from the git repo and run the following command in this new directory:
$ docker-compose up
This starts Kestra running with H2 as the database. In the above docker compose, we redirected the port 8080 to 8085 and 8081 to 8086. You can change it to any port you want by updating the docker-compose.yml file.
Next, enter in the /ui folder, create a file (or update the file if created above) ui/.env.development.local with the content VITE_APP_API_URL=http://localhost:8085 (if you did not use 8085 as the port for Kestra, remember to also change it here).
Finally, install the dependencies with npm install and serve the UI with hot reload at http://localhost:5173 using the command: npm run dev.
Kestra Devcontainer
Thanks to the Kestra community, if using VSCode, you can also start development on either the frontend or backend with a bootstrapped docker container without the need to manually set up the environment.
Check out the README for set-up instructions and the associated Dockerfile in the respository to get started.
Plugin development
If interested in developing a plugin for Kestra, check out the Plugin Documentation.
Code of Conduct
This project and everyone participating in it is governed by the
By participating, you are expected to uphold this code. Please report unacceptable behavior to [email protected].
Legal Notice
When contributing to this project, you must agree that you have authored 100% of the content, that you have the necessary rights to the content and that the content you contribute may be provided under the project license.
Submit issues
To submit feature requests or report bugs, please open an issue on GitHub.
Reporting bugs
Bug reports help us make Kestra better for everyone. We provide a preconfigured template for bugs to make it very clear what information we need.
Before reporting a bug, please search for your issue in our already reported bugs to avoid raising a duplicate.
Reporting security issues
Please do not create a public GitHub issue. If you've found a security issue, please email us directly at [email protected] instead of raising an issue.
Requesting new features
Use our issue templates when opening new issues. It contains a few essential questions that help us understand the problem you are looking to solve.
To see what has already been proposed by the community, you can look here.
Was this page helpful?